""

Technical

SMEs Run SAP – Myth 3: SAP is Too Complicated for Us

Blog number 3 on our SAP Myth Busting Series. It intends to show how SAP BusinessObjects Business Intelligece (BI)can take you on a simple route to real business benefits. We know that implementing new IT systems can be a daunting prospect for some businesses. They worry that it’ll interrupt their everyday activities, take time to deploy and that staff will need time to get used to it. Similarly, when we talk to small to medium-sized enterprises (SMEs) about SAP software, they’re often under the false impression that SAP software is too complex for a business of their size. While they agree it could help them, they’ve always assumed it’s built for large enterprises.

The complexity of SAP is yet another myth that vanishes when you start looking at hard facts. We often speak to SMEs and they’re looking for software that’s easy to run, install and use, and they want to see real-life examples to prove it. They want to see organisations like theirs that have been there and done it. Thankfully, for us, SAP has 88,000 SMEs that have been there and done it. You can see what some of them have achieved by clicking here, they’ve got the figures to prove that it doesn’t take long to deploy the software and see a return on investment.

In the last few years, the number of SMEs implementing SAP software has tripled. That’s partly down to the fact that it’s easy to use and install, but also because it delivers all the benefits that SMEs are led to believe are just for the big boys. It’s not usually very long before they’ve automated previously manual processes, gained greater insight into their business and generated significant cost savings.

Clariba can help you unleash the potential of your SME, with the right business intelligence solution for your company, no matter how you are running it now. Our solutions based on SAP BusinessObjects technology and the expertise of our consultants will help you implement faster so you can enjoy the benefits quicker. We are also experts in end user training, to make sure that your employees will make the best of their new BI tool.

Still think SAP might be too complicated for you? watch this SAP Video and think again!

If you are an SME and want to know more about Clariba and SAP BusinessObjects Solutions, get in contact with us.

Clariba Webinar – Exxova MyBI Mobile: Movilidad para su Negocio

Obtenga la posibilidad de tomar decisiones a cualquier momento visualizando los datos de su empresa desde su dispositivo móvil con Exxova MyBI

Asista a nuestro Webinar (en Castellano) 16 de Mayo de 11.00 a 12:00 (CET GMT+1:00)

REGISTRO AQUÍ


Muchas empresas han realizado importantes inversiones en el desarrollo de sus soluciones de Business Intelligence. En el caso de SAP BW y BusinessObjects, dichas empresas han acumulado cientos de informes utilizando herramientas como Crystal Reports, Web Intelligence y Dashboards (Xcelsius) de SAP, realizando además grandes esfuerzos para establecer un modelo de seguridad y suponiendo todo ello, una inversión considerable. La percepción actual del mercado es que los dispositivos móviles actuales, no pueden manejar el análisis de datos de la misma manera en que lo hacen las soluciones de BI avanzadas y maduras de hoy en día, por lo que los negocios tienden a modificar sus procesos y contenidos para la movilidad.

Sin embargo, la aplicación MyBI Mobile permite a las compañías aprovechar sus inversiones anteriores. Con ella el usuario puede acceder al contenido crucial de toda la empresa en cualquier lugar, en cualquier momento y sin ninguna modificación importante en el contenido o la plataforma existentes. Los usuarios pueden imprimir, cambiar, actualizar y hacer todo el trabajo que realizan actualmente en el sistema BI de la empresa a través de un dispositivo móvil, facilitando la acogida por parte de los usuarios.

Le invitamos a invertir una hora de tu tiempo para conocer esta solución y verla en acción en nuestro webinar MyBI. La agenda del evento es:

  • Introducción
  • Características principales de Exxova MyBI Mobile
  • Beneficios principales de Exxova MyBI Mobile
  • Manifestación
  • Preguntas y respuestas

Para obtener más información visite nuestro sitio web.

Saludos cordiales,

Lorena Laborda Business Development Manager – Clariba EU

SMEs Run SAP – Myth 2: SAP is Too Expensive for Us

Continuing on our series of blogs on Myths that surround SAP, this second one intends to show how spending can be the best way to save.

Invest to Save

A popular piece of received wisdom is that you have to speculate to accumulate, or, in simple terms, you've got to spend money to make money. Most businesses know that you can’t just throw money at a problem. However, they also recognise that carefully planned purchases can pay dividends.

Clariba works with many small to medium-sized enterprises (SMEs) and we know how important every financial decision is to them. That’s why it’s important that we can demonstrate the value of what we do. Most of the businesses we talk to know SAP software can help them reduce costs. However, some of them have been under the impression that the software is only available to enterprise organisations with big budgets. These businesses risk missing out.

We get to break the good news that SAP is an affordable option for SMEs. In fact, SAP has around 88,000 SME customers to prove it. These businesses are not only reducing costs with SAP, they’re also boosting profitability. In most cases, that translates into a quick return on investment. As a result, we find that most of the SMEs we talk to conclude that they can’t afford not to deploy SAP software.

Whats more, Clariba´s solutions based on SAP BusinessObjects have helped small and medium sized business to:

  • automate distribution process of reports to users

  • improve management performance with reporting, query & analysis, and data integration

  • optimize customer support resources

  • improve campaign effectiveness

  • enhance data quality and compliance

We also have available our range of pre-packaged solutions called FastTrack. They are accessible and quick to deploy, which means your company can start enjoying the benefits of a top technology tool in a short time frame.

Here is what one of our SME clients has to say about one of our FastTrack solutions: “With Clariba’ FastTrack for Siebel CRM solution we are now able to better analyze data, segment customers, measure the ROI of our marketing initiatives and provide a rolled-up sales forecast. This capability allows us to be more competitive, offer better service to customers and provide a faster response to changing market conditions.”

Is your company an SME?  Contact us to  know more about how to benefit from SAP Solutions

SMEs Run SAP - Myth 1: You Have to be Big to Work with SAP

Mitos y malentendidos ensucian el mundo de los negocios. Todas las pequeñas empresas son ágiles, todas las empresas son grandes entidades corporativas, las cifras de ventas son las más importantes, los clientes siempre comprarán el mejor producto. Como todos sabemos, estos no resisten el escrutinio. Algunas empresas grandes son ágiles, otras no lo son, el flujo de efectivo es más importante que las ventas y el mejor producto no siempre es el más popular. La gente de negocios no puede permitirse hacer suposiciones y seguir ciegamente estos conceptos erróneos. Es por eso que hacemos nuestra investigación y basamos decisiones en hechos. Comenzamos una serie de publicaciones en el blog sobre los mitos que rodean a SAP, la plataforma que Clariba eligió para llevar Business Intelligence (BI) a nuestros clientes. Este primero pretende explicar por qué no tiene que ser una empresa para trabajar con SAP y SAP BusinessObjects.

Las pymes pueden ejecutar SAP

SAP en realidad trabaja con una base de clientes compuesta por una mayoría de pequeñas y medianas empresas (PYME). El software SAP combinado con la experiencia en implementación de Clariba les permite automatizar procesos y obtener una valiosa información sobre sus negocios. Al hacer esto, estas empresas eliminan las suposiciones de la ecuación, lo que significa que, en lugar de basarse en pruebas anecdóticas, trabajan con los hechos. El resultado es que les resulta más fácil detectar oportunidades e identificar áreas para mejorar.

Sin embargo, antes de que estas empresas comiencen a lidiar con los hechos, a menudo necesitan desafiar otro conjunto de ideas preconcebidas. Un Clariba que aparece con frecuencia es que SAP solo trabaja con organizaciones empresariales. Pero este no es el caso. Más del 77% de los clientes de SAP son pymes. ¡Eso es sobre 88,000 negocios! Además, SAP ha estado trabajando con pymes durante casi 40 años. Como resultado, la compañía entiende los desafíos únicos que enfrentan y las herramientas que necesitan para crecer.

El trabajo de Clariba es traducir eso a los clientes, ayudándolos a adaptar sus requisitos a la mejor herramienta de SAP disponible. Nuestras auditorías ayudan a las PYMES a tener una idea de dónde se encuentran en términos de su entorno de BI y los beneficios que podrían disfrutar con Clariba y SAP:

  • nuestras soluciones pre-empaquetadas accesibles permiten un despliegue rápido

  • optimizar los procesos mediante la automatización de las tareas de informes

  • mejorar la calidad de los datos, reduciendo la información engañosa que conduce a una toma de decisiones deficiente

  • descubra hechos ocultos y ofrezca ideas para tomar el mejor curso de acción.

  • ayudar a las pequeñas empresas a mejorar la gestión de los diferentes departamentos.

Si usted es una PYME y desea saber más acerca de las soluciones SAP, contáctenos.

Problem Uninstalling Data Services

I have faced a problem uninstalling Data Services  recently and I wanted to share the resolution, just in case you find the same problem. I was trying to upgrade a Data Services machine following SAP procedure (this is copying the configuration files uninstall and then install the new version – not very sophisticated as you can see). This was not as simple as I first thought.

Problems started after uninstalling the software, the new version refused to install stating that I should first uninstall the previous version. I uninstalled the software again… but Data Services is still there, so uninstalled again, but this time the process failed (makes sense as the software is already uninstalled), so I kept trying… reboot…uninstall… reboot…rename older path name… reboot…you see where this is going…


Entonces, ¿cómo finalmente solucioné esto?

  1. Inicie el Editor del Registro (escriba regedit en una ventana de comandos o en el cuadro de diálogo Ejecutar).
  2. Take a backup of the current Registry content. To do this, with the top node of the registry (Computer) selected go to File -> Export and select a name for the backup file.
  3. Delete the Key: HKEY_LOCAL_MACHINESOFTWAREBusiness ObjectsSuite 12.0EIM (Suite XX.X may vary).  NOTE: You may want to write down the key KEY_LOCAL_MACHINESOFTWAREBusiness ObjectsSuite 12.0EIMKeycode first as it contains the license code.
  4. To remove the entry for the software in the Uninstall Window’s dialog, go to HKEY_LOCAL_MACHINESOFTWAREMicrosoftWindows CurrentVersionUninstall and look for a KEY which property DisplayName is “BusinessObjects Data Services.
  5. Finally delete the content of the installation directory (typically: C:Program FilesBusiness ObjectsBusiness Objects Data Services)

Now you can launch the installer and it should work.

Hope this may help you if in case you are experiencing the same issue. If you have any doubts or if you ever faced the same issue, leave a comment below.


Instalación de servicios de datos 4.0 en un entorno distribuido

Following my first experiences using SAP BusinessObjects platform 4.0, I decided to write this article after spending 3 days to discover how to install Data Services 4.0 in a distributed architecture. Why did I spend so much time to figure this out? There is something different in the new Data Services: SAP has tried to unify the security and the control of the servers using the CMC. With this new feature we will be able to manage Data Services users and services using the CMC instead of using the Data Services Management Console. This has brought slight changes to the installation process of Data Services 4.0 in comparison with other releases.

I was working with a distributed architecture, which means that I was planning to install the SAP BusinessObjects platform (including Live Office, Dashboard Designer 4.0, Client Tools and Explorer) in one server, let’s say “ServerA”, and Data Services 4.0 in a separate server named “ServerB”.

If you have installed older version of Business Objects such as XI R2 or XI3.0 and 3.1, you know that we would install BusinessObjects platform in ServerA and Data Services in the ServerB and then we would see that we don’t have Data Services intragrated with the rest of the platform and probably we would see the same in the CMC that is shown in the image below.

As you can see this image comes from a SAP note that explains how to solve this problem on past releases, but if you installed Data Services 4.0 in a distributed architecture, the error won’t be solved using the solution described in the SAP note 1615646.

Once the scenario is clear let’s start with the process to install Data Services in a distributed architecture. Before starting ensure that BusinessObjects 4.0 platforms and the client tools with their latest service packs and patches are installed in the ServerA.


Step 1: Install Data Services 4.0 in ServerA

As in every new software that has to be installed the first step is uncompress (if needed) the file downloaded from SAP service market place in the ServerA. Open the root folder, go to data_unit and run the setup.exe. After that chose the language to use during the installation.

After these “typical” steps the installation program checks for required components. Review the results and decide whether to continue with the installation, or abort and correct any unmet requirements.

In the next three steps you have to review the SAP recommendations, accept the license agreement and finally, fill the gaps with the license key code, name and company. Once the license key is verified you can chose the support language packs you wish to install.

Then it is time to choose the folder, but in this case, the wizard doesn’t let you choose because BO platform was install before so it takes the BO installation folder as a default.

After that you have to configure CMS information. In this case our ServerA is going to be named “MVBOBITEST01”
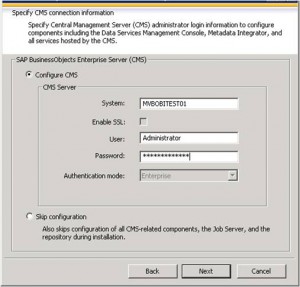
This is the important step! The next screen invites you to select what you want to install. In ServerA you have to install all (if needed) Data Services’s features apart from Designer, Job Server y Access server. See the image below.
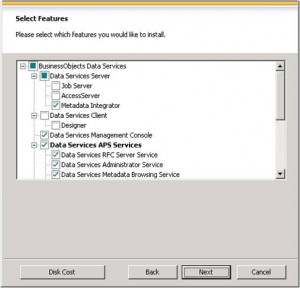
The subsequent screen will ask for merging with an existing configuration. In this case no existing configuration can be reused so the answer is: skip configuration.

Then you can choose if you want to use an existing data base server or you want if you want to skip this part and do it after the installation. Chose what suits you best. Imagine that you or your vendor doesn’t have the database or schemas for the CMS repositories ready when you were planning to install Data Services. In that case, you can configure the CMS parameters after the installation without problems.

After filling in the information for the CMS systems data base and the Audit database (if required), the Metadata Integrator configuration starts. I am not going to describe this step in depth because it hasn’t got an impact on our installation. Furthermore, configuring Metadata Integrator is not  difficult; as always you only have to choose the ports, folders and the name.

Once we have finished installing Metadata integrator and ViewData, the installation will start. After the installation process we can proceed to the next step.

Step 2: Install Data Services 4.0 in ServerB

After a few hours installing the first part of Data Services we are ready to install Data Services in a dedicated server which is going to have the ETL only.

Again it is time to uncompress the file you downloaded before, run the DVD or whatever is the installer you are using. Run the setup.exe.

Once the installation starts, we are going to repeat the same firsts steps mentioned before until we reach the screen to specify CMS information. Add the CMS information related with the ServerA or “MVBOBITEST01”. Why? Because we don’t have CMS installed in the ServerB.

Choose the components that we did not choose before during the BusinessObjects server installation: Job Server, Access server y Designer.  

As we did in the ServerA installation choose skip the configuration if no previous configuration exists.

In the next step you have to configure the account on which you would like to run Data Services. You can choose to run it using a system account or run it with a specific service account previously defined. What is good about using a service account rather than a system account is that if you want to stop a service (like Data Services Job Server) you need the password of this account, because it is not related to the system account with which you log onto the S.O.

Then configure the Access Server. In this case I kept the default values.

After the last step the wizard asks to start the installation. After a couple of hours you will have Data Services 4.0 running.

There is another important point after the installation process that I will be covering on my next article due on the beginning of May:  the repository configuration. One of the new and best features of Data Services 4.0 is the integration with the BO platform using the CMC, which results in a complete integration when you configure the repositories properly.

If you have any questions or other tips, share it with us by leaving a comment below.

How to convert a Universe to Multi-source in SAP BusinessObjects BI4

The new BI 4 offers a very powerful meta-layer capability: a single Universe can sit on top of several data-sources with great benefits offered by a real-time integration. At a first glance, you might think that existing Universes would need to be typed from scratch, but this article explains how to re-use an existing Universe to provide this highly scalable and expandable meta-layer.

The multi-source Universe

A multi-source Universe is now designed as a project with the following components:

  • CONEXIONES
  • Data Foundation
  • Capa empresarial

These items can be created and configured separately, and then be connected one with another. The cycle of creating a new Universe is easy because the connections, data foundation and business layer can be created intuitively and always using the common SQL language, so no need to know native connection peculiarities. Once built, what happens behind the scenes is transparent to the end user and he/she will see that Business Objects will produce a query which takes pieces of information from different sources in real-time.

However, while the creation process is quite simple when generating a new Universe from scratch, it is not so straightforward if we are migrating from a legacy universe. Let’s see why.

UNV to UNX conversion process

In our experience, the three steps to be completed are the following:

  • Legacy Universe (UNV) import: Using the standard migration process the legacy Universe can be inserted into the new BI4 platform. This can be done in a very short time and it has the following quick advantages:
    • Migrated Web Intelligence reports will still sit on top of this legacy meta-layer.
    • Live Office BI4, Crystal 2011 and other client tools can continue to perform as these are still using this format.

But we still cannot use platform modules like Explorer BI4 or Crystal Enterprise, or use the new security model or the new features advantages of the new Information Design platform, so the natural next step is to enable this.

  • New Universe (UNX) conversion: From the Information Design tool we will click on File, “Convert .unv universe” and a new UNX universe is provided, with a project containing the three main items: Connection, Data Foundation and Business Layer. The advantages are the ones we previously stated, but there is one big disadvantage: The automatically generated Data Foundation is mono-source type, so the resulting Universe will not be scalable, and there is no easy way of turning a Data Foundation from mono to multi-source. Therefore this will need to be re-built. The process for re-building the Universe is explained simply in the following step.
  • New Universe (UNX) multi-source conversion:

A new Data Foundation shall be created, following the steps stated below:

  • Define connections
  • Create new Data Foundation
  • Copy and paste items to the new Data Foundation and/or re-type tables and joins using the standard SQL language.

Also the Business Layer needs changes, basically to be re-pointed to the new Data Foundation. The recommended steps are:

  • Re-point the Business layer to the new Data Foundation
  • The calls from the objects to the tables will need to be re-typed using the standard SQL language

A limitation in this stage is that the useful “View Associated Table” feature that showed the table lineage from a certain object has disappeared, so this might become quite a manual work. Opening the Universe Design tool in paral.lel with the Information Design tool to get the lineage might help here.

Once this is done, verify and export this new universe.

As a final step, the WebI reports can now be re-pointed to the new multi-source UNX so they can be enhanced with new alternative data.

Process summary

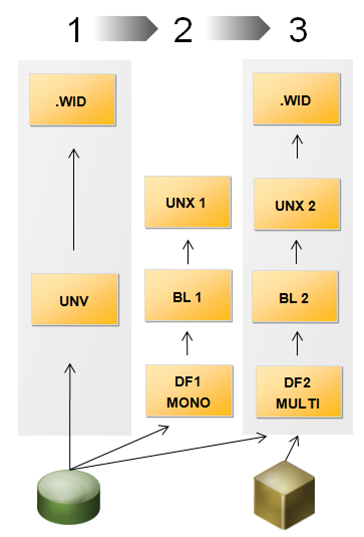
See in the following diagram a summary of the process:

  • Step 1: Legacy Universe import
  • Step 2: New Universe UNX conversion
  • Step 3: New Universe UNX multi-source conversion

UNV to UNX conversion process summary

UNV to UNX conversion process summary

Conclusión

In the short term, in BI4 it should become a common practice to have 3 versions of the same universe:

  • UNV: To preserve the legacy WebI reports and to use certain client tools like Crystal 2011 or Live Office.
  • UNX mono-source: To use certain platform tools like Explorer or Crystal Enterprise and to have a higher level functionality.
  • UNX multi-source: To use certain platform tools like Explorer or Crystal Enterprise, have a higher level functionality and be able to use several sources in one Universe.

Mid-term only this last multi-source version should remain.

Beneficios

This Universe conversion method is time-efficient as it reuses all existing folders and objects, and shows tips for a better Universe re-creation.

The multi-source Universe gives superior benefits to the end user, providing a real-time integration and report design simplicity which will make their life easier. It also helps the meta-layer designers who will see their development time reduced with the help of the new design panel functionalities and a common standard language which is easier to understand. Project managers and architects can also consider the fact that they do not have to build a professional Data Warehouse for their projects, and with all this, IT managers will see a quick ROI and lower TCO for their investments.

If you have questions about this method or about the new Information Design Tool in SAP BI4, or if you want to share your experience or tips, please feel free to leave a comment!

Cómo desplegar aplicaciones web SAP BusinessObjects 3.1 con IBM Websphere

Como todos sabemos, Tomcat e IIS son las herramientas más utilizadas para implementar aplicaciones web (por ejemplo, InfoView, CMC, ..) en SAP BusinessObjects y que esta implementación puede realizarse automáticamente a través de la instalación del servidor de BusinessObjects. Sin embargo, SAP BO le permite realizar esto con otras aplicaciones. En este artículo hablaré sobre cómo podemos implementar aplicaciones web de SAP BusinessObjects utilizando IBM Websphere.

En primer lugar, debemos aceptar que cualquier implementación web, aparte de las realizadas con Tomcat e IIS, debe realizarse manualmente.

  • Aplicación admitida

SAP BusinessObjects 3.1 es compatible con IBM mediante el uso de Websphere 6 Express Edition o 6 ND Edition.

  • Instalación
    • Asegúrese de que IBM Wepsphere se haya instalado correctamente en la máquina y que todos los servicios estén en funcionamiento.
    • During the SAP BusinessObjects server installation, when you rich the web deployment part DO NOT SELECT any of the options to deploy Tomcat or IIS, just check the box to deploy the web application manually later.
  • Archivo de configuración web
    • El archivo de configuración de wdeploy es:

implementaciónconfig.websphere6.

    • Modify the config.websphere6 file (lines to be modified are in Bold).

archivo config.websphere6:

# as_dir: el directorio de instalación del servidor de aplicaciones

as_dir = C: Archivos de programaIBMWebSphereAppServer

# as_instance: la instancia del servidor de aplicaciones para implementar

as_instance = server1

# as_virtual_host: el host virtual al que estarán vinculadas las aplicaciones

as_virtual_host = default_host

# as_soap_port: el puerto de administración SOAP al servidor de administración.

# Si el valor no está configurado (si la línea está comentada), se utiliza el valor predeterminado.

as_soap_port = 8880

# as_admin_is_secure (predeterminado: falso): ¿se activa la seguridad en la web?

# La seguridad se activa cuando un usuario que desea iniciar sesión en el portal de administración tiene que proporcionar

# un nombre de usuario y una contraseña. Cuando la seguridad NO está activada, no es necesario

# proporcionar as_admin_username y as_admin_password (las líneas se pueden comentar)

as_admin_is_secure = false

as_admin_username = admin

# as_admin_password =% AS_ADMIN_PASSWORD%

# ws_instance: la instancia del servidor web que atenderá las solicitudes, en modo distribuido

# ws_instance = webserver1 (PARA USAR SI EL servidor web está instalado en modo SPLIT)

## No elimine la siguiente línea

enforce_file_limit = true


  • Comando usado para desplegar las aplicaciones

Para implementar la aplicación web, use la línea de comando (CMD) para escribir el comando en el servidor BO, el comando es:

"wdeploy config.websphere6 deployall"

Esto desplegará todas las aplicaciones web BO en el servidor IBM WebSphere, el proceso tomará aproximadamente 20 minutos para desplegar. Se instalan 17 aplicaciones.

  • Implementación de aplicaciones web con la consola de administración de websphere

Asegúrese de que su servidor de aplicaciones web WebSphere esté instalado, configurado y ejecutándose antes de desplegar archivos WAR.

  1. Inicie sesión en la consola "Administrativa de WebSphere Application Server" utilizando la siguiente URL: http://WAS_HOSTNAME:PORT/admin El número de puerto predeterminado de la consola de administración de WebSphere es 9060. Dé un nombre único para su aplicación web y continúe con el "Paso 2".
  2. Debajo del encabezado Aplicaciones del menú de navegación de la consola, haga clic en Aplicaciones empresariales en el panel de navegación izquierdo. Resalte el servidor que creó (o resalte servidor1 si no creó el suyo propio) desde los Clústeres y servidores y active la "casilla de verificación Seleccionar". Continúe con el "Paso 3"
  3. Haga clic en el botón Instalar y navegue hasta la ubicación del archivo WAR para implementar. Si realiza la implementación desde un sistema de archivos remoto, seleccione la opción "Sistema de archivos remoto". Seleccione el host virtual que creó (o default_host si no creó el suyo) de la lista desplegable de Virtual Host. Continúe con el "Paso 4".
  4. Ingrese una raíz de contexto para el archivo WAR (por ejemplo, / CmcApp para CmcApp.war) y presione el botón Siguiente, seguido de Continuar.
  5.  Revise la página de resumen y presione Finalizar cuando haya terminado.
  6. Haga clic en Guardar en configuración maestra.
  7. Haga clic en el enlace Guardar, luego en el botón Guardar.
  8. Debajo del encabezado Aplicaciones del menú de navegación de la consola, haga clic en Aplicaciones empresariales en el panel de navegación izquierdo.
  9. Verifique que el archivo WAR se haya implementado y luego haga clic en el botón Inicio. Repita los pasos 1-11 para cada archivo WAR a implementar.
  • Prueba

Para probar su implementación, simplemente abra el navegador y escriba la URL (EX. InfoView):

http://”BOservername”:”PortNumber”/InfoViewApp


Si tiene alguna pregunta o contribución, deje un comentario a continuación.

Asistir al Webinar de Clariba "¿Por qué migrar a SAP BusinessObjects BI 4?"

Do you wish to know more about the reasons to migrate to SAP BusinessObjects BI 4, the most advanced Business Intelligence platform?

Attend our Webinar on the 12th of April, from 11:00-12:00 CET (Presented in Spanish)

REGISTRAR AQUÍ

SAP BusinessObjects BI 4 offers a complete set of functionalities that are key to today´s Business Intelligence market: an improved performance management, reports, search, analysis, data exploration and integration. This new version of SAP´s BI platform introduces several significant improvements to your BI environment, with a great number of functionalities designed to optimize performance.

With this in mind, Clariba invites you to invest an hour of your time to get to know the news and advantages of SAP BusinessObjects BI4, the most advanced BI platform.

The agenda of our webinar is the following:

  • Bienvenida e introducción
  • Qué hay de nuevo en SAP BusinessObjects BI 4
  • Beneficios de migrar a SAP BusinessObjects BI 4
  • ¿Por qué migrar con Clariba?
  • Preguntas y respuestas

For more information about SAP BusinessObjects BI 4, Visita nuestro sitio web.

Atentamente,

Lorena Laborda Business Development Manager - Clariba


Asista al Webinar ¿Porqué migrar a SAP BusinessObjects BI 4?


¿Desea conocer más acerca de los motivos para migrar un negocio sap bi-0, la plataforma más avanzada de inteligencia empresarial?

Asista a nuestro Webinar el 12 de Abril de 11.00 a 12:00 (CET)

REGÍSTRESE AQUÍ


SAP BusinessObjects BI 4 es la primera y única plataforma de Business Intelligence (BI) que proporciona un completo abanico de funcionalidades claves en el actual mercado de BI: una mejor gestión del rendimiento, informes, consultas y análisis, exploración de datos e integración. Esta nueva versión de la plataforma de SAP introduce avances significativos en su entorno de BI,  con un gran número de prestaciones diseñadas para optimizar su rendimiento.

Con esto en mente, Clariba le invita a invertir una hora de su tiempo para conocer las novedades y ventajas de SAP BusinessObjects BI4, la plataforma más avanzada en el mercado de Business Intelligence.

La agenda para el webinar ¿Porqué migrar a SAP BusinessObjects BI 4? es la siguiente:

  • Introducción y bienvenida
  • Novedades en sap businessobjects bi 4
  • Ventajas de migrar a sap businessobjects bi 4
  • Porque migrar con clariba
  • Preguntas y respuestas

Para obtener más información acerca SAP BusinessObjects BI 4, visite nuestro sitio web. Saludos cordiales,

Lorena Laborda Business Development Manager - Clariba

Applying Custom Security on Web Intelligence Documents

Uno de los principales obstáculos que debe superar un desarrollador de Web Intelligence es cómo lidiar con la seguridad de los datos. De hecho, la búsqueda de seguridad de datos sigue siendo la principal preocupación para muchas empresas que intentan garantizar la disponibilidad, integridad y confidencialidad de la información comercial, protegiendo tanto la base de datos de las fuerzas destructivas como las acciones no deseadas o la visualización de datos no deseados de usuarios no autorizados.En SAP BusinessObjects tenemos varias formas de configurar una hoja de ruta de seguridad en términos de acceso a datos de autorización, pero esta vez me gustaría hablar sobre cómo usar la seguridad personalizada en nuestros documentos WebI mediante una tabla simple, uniones forzadas en el Diseñador de universos y la herramienta WebI para mostrar solo los datos que un usuario está autorizado a ver.

Tenemos el siguiente escenario: Imagine que tenemos un grupo con diferentes niveles de jerarquía en términos de niveles de acceso a datos. Cuanto más alto se encuentre en la organización, más datos tendrá acceso. De esta manera, el primer nivel dentro de la jerarquía puede ver todos los datos, el segundo nivel en la jerarquía puede ver sus datos de nivel y los niveles a continuación, pero no tendrá acceso a la información del primer nivel, el tercer nivel puede ver sus propios datos y niveles a continuación , pero no tendrá acceso a información de segundo y primer nivel ... y así sucesivamente.


Veamos ahora un enfoque paso a paso sobre cómo lograr esto

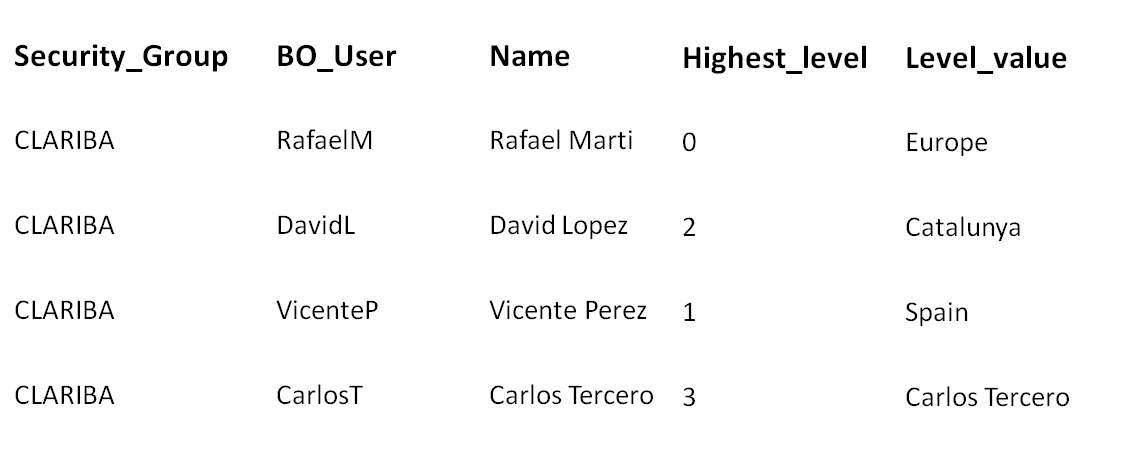
Lo primero que debe hacer es un ejercicio para definir cuál es la estructura de la jerarquía, especificando el nivel de cada individuo y la fecha a la que tendrá acceso. Después de eso, tenemos que crear una tabla en nuestra base de datos donde almacenaremos grupos, usuarios y privilegios. Los campos clave para este propósito son:

BO_User: Esto se verificará con los usuarios actuales que tienen acceso a la webi.

Nivel más alto: Nivel en la jerarquía a la que pertenece el usuario. Para este ejemplo tendremos 4 niveles de organización donde 0 es el nivel más alto y 3 es el más bajo.

Level_value: se verificará en la tabla de hechos.

Una vez que tengamos la tabla con todos los datos relacionados ya almacenados, es hora de asignarla en la metacapa de SAP BusinessObjects. Para este propósito, tenemos que importar el universo afectado y crear una tabla derivada que recupere todos los datos relacionados para un usuario determinado (esto significa todos los datos que un usuario puede ver de acuerdo con su nivel de acceso a datos). El código SQL debería ser similar al siguiente:

SEL       BO_User, Level_Organization_3 FROM  CLARIBA.SECURITY a

IZQUIERDA UNIRSE

(SEL Level_Organization_0 , Level_Organization_1 , Level_Organization_2 , Level_Organization_3 FROM CLARIBA.FACT_TABLE GROUP BY 1,2,3,4) b

ON (

(Highest_Level=0 AND UPPER (a.level_value) = b.Level_Organization_0) O (Highest_Level=1 AND UPPER (a.level_value) = b.Level_Organization_1) O (Highest_Level=2 AND UPPER (a.level_value) = b.Level_Organization_2) O (Highest_Level=3 AND UPPER (a.level_value) = b.Level_Organization_3) )

Dónde security_group=' CLARIBA'


Esta tabla derivada en particular creará un par de objetos que se usarán en la WebI que queremos proteger (BO_User y Level_Organization_3).

El tercer paso es desarrollar y aplicar la seguridad en la WebI donde queremos llevar a cabo la restricción de datos. Para este propósito tenemos que crear dos nuevas dimensiones y un detalle. Asegúrese de que su consulta incluya esos objetos recién creados.

First task is discovering which users are trying to access the WebI. We can get their login by creating a new dimension named “BO_User” that contains the following formula:

 = CurrentUser ()


Once we know who is trying to access WebI, we have to control if the BO_User matches with the User name that we had in our table.  We can create a dimension named “FlagBOuser” with the following formula:

= If (Inferior ([BO_User]) = Inferior ([Nombre de usuario]); 1; 0)


Next step is to control what level of data access this BO_user will have. In other words we are applying a kind of row/column level security. For this purpose we create a detail object named “Level_Organization” with the following code:

= If ([FlagBOUser] = 1; [Level_Organization_3])


Una vez que tenemos estos objetos de información, el último paso es arrastrar y soltar tanto FlagBOuser como Level_Organization como filtros globales a nivel de documento. De esta forma, aplicamos la restricción de datos a cada bloque de datos que se muestra en el informe.

Las condiciones que se aplicarán son simples: "FlagBOuser" debe ser igual a 1, lo que significa que un usuario determinado que tenemos corresponde a un usuario en la tabla de la base de datos y "Level Organization" no es nulo, lo que significa que tenemos datos para mostrar .

En este punto del ejercicio, deberíamos poder restringir el contenido de los datos que se muestran en la WebI de acuerdo con un usuario determinado que quiera acceder a él.

Por último, pero no menos importante, también podemos controlar algunas celdas particulares, como la información de subtotales, creando una bandera que garantice que solo los empleados que tienen permiso puedan ver este contenido.

= If (Lower ([BOUser]) InList ("SilviaR"; "JoseY”); 1; 0)


Como hemos visto en este ejemplo, esta seguridad personalizada en WebI proporciona una alternativa a otros tipos de seguridad que podemos aplicar en nuestro sistema BO (como la seguridad de fila / nivel en Universe Designer). Podemos lograr una solución de seguridad de datos bastante agradable con simplicidad, efectividad y requisitos de mantenimiento reducidos.

Si tiene alguna pregunta, no dude en dejar un comentario a continuación.

EspañolEnglish