""

Asistir al Webinar de Clariba "¿Por qué migrar a SAP BusinessObjects BI 4?"

¿Desea saber más sobre las razones por las cuales migrar a SAP BusinessObjects BI 4, la plataforma de inteligencia empresarial más avanzada?

Asista a nuestro seminario web el 13 de marzo, del 11:00 - 12:00 CET (Presentado en español)

REGISTRAR AQUÍ

SAP BusinessObjects BI 4 ofrece un conjunto completo de funcionalidades que son clave para el mercado actual de Business Intelligence: una gestión mejorada del rendimiento, informes, búsqueda, análisis, exploración e integración de datos. Esta nueva versión de la plataforma de BI de SAP introduce varias mejoras significativas en su entorno de BI.

Con esto en mente, Clariba lo invita a invertir una hora de su tiempo para conocer las novedades y ventajas de SAP BusinessObjects BI4, la solución de BI más avanzada le brindará a su empresa una gran cantidad de funcionalidades diseñadas para optimizar el rendimiento y brindarle Una plataforma escalable y segura.

The agenda of our webinar is the following:

  • Bienvenida e introducción
  • Qué hay de nuevo en SAP BusinessObjects BI 4
  • Beneficios de migrar a SAP BusinessObjects BI 4
  • ¿Por qué migrar con Clariba?
  • Preguntas y respuestas

For more information about SAP BusinessObjects BI 4, visit our website www.clariba.com

Atentamente,

Lorena Laborda Business Development Manager - Clariba


Atienda al Webinar ¿Por qué migrar a SAP BusinessObjects BI 4?


¿Desea conocer más acerca de los motivos para migrar un negocio sap bi-0, la plataforma más avanzada de inteligencia empresarial?

Asista a nuestro Webinar el 13 de Marzo de 11.00 a 12:00 (CET)

REGISTRO AQUÍ


SAP BusinessObjects BI 4 es la primera y única plataforma de Business Intelligence (BI) que proporciona un completo abanico de funcionalidades claves en el mercado actual de BI: una mejor gestión del rendimiento, informes, consultas y análisis, exploración de datos e integración . Esta nueva versión de la plataforma de SAP introduce avances significativos en su entorno de BI.

Con esto en mente, Clariba le invita a invertir una hora de su tiempo para conocer las novedades y ventajas de SAP BusinessObjects BI4, la más avanzada plataforma en el mercado de Business Intelligence, hacer que su compañía se beneficie de un gran número de prestaciones de inversión para optimizar su rendimiento, ofrecer una plataforma escalable y 100% segura.

La agenda para el webinar ¿Porqué migrar a SAP BusinessObjects BI 4? es la siguiente:

  • Introducción y bienvenida
  • Novedades en sap businessobjects bi 4
  • Ventajas de migrar a sap businessobjects bi 4
  • Porque migrar con clariba
  • Preguntas y respuestas

Para obtener más información acerca SAP BusinessObjects BI 4, visite nuestro sitio web www.clariba.com Saludos cordiales,

Lorena Laborda Business Development Manager - Clariba

Gestión de incidentes con SAP BusinessObjects examen, Una sugerida vía de estudio.

Whether you want to expand your personal curriculum or your goal is to become a consultant for your company’s Support Center for SAP BusinessObjects, taking the Incident Managent with SAP BusinessObjects exam (booking code C_BOSUP_90) is a key step that you must take in order to become a certified consultant in this area.

If you have ever tried to obtain a SAP certification before, you will probably be familiar with the feeling of not knowing where to start or which strategy to take in order to study for the exam as efficiently as possible. It becomes a challenge to learn how to combine your study time with the normal day-to-day tasks from work. Therefore, what I will try to share here is a suggested path of study, based on my own experience, to face the Incident Managent with SAP BusinessObjects exam, required to become a certified SAP BusinessObjects Support Consultant.

Lo que debe hacer antes de presentar el examen

In order to become a certified SAP BusinessObjects Support Consultant, you must first approve the Web Assessment Tests for several of BusinessObjects’ key areas, such as WebIntelligence, Universe Designer, BI Root Cause Analysis, among others. The materials for these tests are listed as Required in the Learning Plans that can be found in SAP Channel Partner Portal / Education / SAP BusinessObjects / Role-Based Training / Support Consultants. They are free of charge and relatively easy to undertake.

 ¿De qué trata este examen?

So, first of all we need to know the details and structure of the exam (that can also be found in the following link of SAP Training Site: C_BOSUP_90 Detalles de la reserva). Basically, it consists of 80 questions to be answered in 180 minutes. The questions are focused in proving that “the candidate has a good overall understanding within this support consultant profile, and can apply this knowledge practically in the handling of client messages under guidance of an experienced support consultant”.

Además, debe tener en cuenta que esta prueba está estrechamente relacionada con la herramienta SAP Solution Manager, por lo que es muy recomendable tener este producto instalado en su empresa o, al menos, encontrar una manera de obtener conocimientos prácticos.


¿En qué áreas debe centrarse?

Como en todos los exámenes, la mejor sugerencia es leer todo el material de aprendizaje requerido al menos una vez. Por lo tanto, me parece más útil en este momento para resaltar los temas contenidos en la mayoría de los documentos en los que debe centrarse más en profundidad.

  • Resolución de mensajes, análisis de problemas y suministro de soluciones al cliente:
    • One of the key documents that you will find in the learning material is the L1220 – Message Solving.  Here you should pay attention to the technical terms and SAP definitions explained since several questions are based on this part.
    • Even more important is the L1225 – Efficient Message Solving document, you must carefully read each Typical Situation given and the type of answers, information gathered and interactions that are recommended to have with a customer in each situation.
  • Procesamiento de mensajes: Esta sección no debe confundirse con el tema Resolución de mensajes, ya que se refieren a diferentes partes del proceso de soporte.
    • The L1260 – Message Processing document contains several exam questions, so be sure to understand the different workflows in and out of Partner working hours, the different message statuses and how to access SAP Notes. Also, you will have some questions covered if you memorize the different SAP transactions that are explained and learn how to gather customer information before sending it to SAP Support Backbone when necessary.
    • On the other hand, the L1270 – Message Processing via Work Center and the L1275 – How to create a message documents contain a lot of information regarding the basic workflows of SAP Solution Manager and its Work Center. It is advisable to have a correct understanding of all of them since some questions are related to this.
  • VAR Servicio técnico:
    • In the L0120 – VAR Support enablement program document you should understand the key vocabulary explained as well as the tasks and responsibilities of employees in a VAR Support Team.
    • Also, the L0125 – Incident Management is a very important document where understanding the three task levels, the message flow and how High Priority messages are attended is absolutely key.
    • Finally, in L0155 – Mission Critical special attention must be given to the Service Level Agreements (SLA) in order to domain under which terms with SAP you will be operating as a Support Consultant.
  • Using SAP Enterprise Support: In the Providing Solutions section of the exam’s learning plan you will find a document that comes without a code, called SAP Service and Support. It refers basically of how partners benefit from SAP Service and Support, so at least you should give it a good read to ensure two or three questions from the exam.
  • Comprensión básica de SAP Solution Manager: Esta sección es un complemento de procesamiento de mensajes.
    • The L2220 – EarlyWatch, Service Level and Solution Reporting is practically summarized in the document that I will explain next. However, give attention to understand definitions and transactions as well as understanding EarlyWatch Alert general purpose and type of alerts.
    • The last document with key information that you will encounter is the L2225 – Early Watch Alert, Overview. Several exam questions are related to its content, so understand the differences between EarlyWatch Alert and EarlyWatch Check, the frequency of both of them, how the checks are performed and finally, how the checks are included in the support agreement.

Conclusiones finales

As always, it is recommended to see a set of sample questions to have a more practical idea of what is coming up. You can find some examples in the following link of SAP Education: C_BOSUP_90 Samples Questions

En mi experiencia personal, diría que este no es el examen de certificación más difícil que ofrece SAP, por lo que realmente le gustaría animar a leer todo el contenido al menos una vez y luego centrarse en los temas clave mencionados anteriormente y que dejaría Usted está muy bien posicionado para obtener un resultado exitoso.

Espero que este artículo demuestre ser útil para obtener una comprensión general sobre cómo abordar este examen, y espero que le ayudará a convertirse en un nuevo Consultor de Soporte SAP BusinessObjects! ¡Buena suerte!

Si tiene alguna pregunta o algo que añadir para ayudar a mejorar este mensaje, por favor, siéntase libre de dejar sus comentarios y compartirlo con otra persona si lo encontró útil. Además, puede ponerse en contacto conmigo a través de Twitter @IsaacGil_BI


Adjunte una captura de pantalla del panel de control a un correo electrónico con un "clic"

Es impresionante hasta dónde podemos llegar durante un proyecto si tratamos de cumplir con todos los requisitos de nuestros clientes, incluidos aquellos que parecen algo complicados de resolver. Durante uno de nuestros proyectos en Oriente Medio, recibimos una de esas solicitudes. Nuestro cliente nos pedía que creáramos una funcionalidad para enviar capturas de pantalla de su tablero por correo electrónico. Lo suficientemente justo.

Inmediatamente pensamos en instalar alguna herramienta gratuita para creadores de PDF y decirles que imprimieran en pdf y luego adjuntasen el documento al correo electrónico, pero hubo demasiados pasos de acuerdo con nuestro cliente. Necesitábamos lograr esta funcionalidad con un solo "clic".

En un par de horas y algunos correos electrónicos enviados a mis colegas Pierre-Emmanuel Larrouturou y Lluis Aspachs, estábamos trabajando en una solución destinada a trabajar con software de código abierto y herramientas gratuitas que encontramos en Google.

A continuación se detallan los pasos que seguimos para lograr el objetivo:

Creamos el archivo exe que hace la instantánea y lo adjuntamos a un correo electrónico

  • Busca las carpetas C: / Temp o D: / Temp para guardar la imagen.
  • Busca Outlook (Office 2003, 2007 o 2010) tanto en C: / como en D: / Drive
  • Agregamos Xcelsius_burst.bat para omitir las ventanas y autorizar el lanzamiento del exe
  • Guardamos los dos archivos dentro de C: / Drive pero también se puede agregar a D :. si el usuario crea una carpeta dedicada, solo se debe editar el archivo .bat
  • Agregamos la ruta del archivo bat a un botón de URL en Xcelsius y lo ejecutamos

Notas: compruebe las opciones de su navegador para evitar las ventanas emergentes de murciélagos si son un problema. Esta versión solo funciona si está instalada en cada máquina del cliente. Si desea instalarlo en un servidor (para evitar las múltiples instalaciones), puede crear una solución más compleja utilizando los Pstools disponibles de forma gratuita en la red y agregándolos a su servidor web (en nuestro caso, era Tomcat).


Puede descargar los archivos haciendo clic en el siguiente enlace. Esta solución es bastante simple, pero hizo que nuestro cliente estuviera muy contento.

Explosión del tablero de instrumentos


Solo para agregar más valor al artículo, hay otra forma de resolver este problema: también estamos agregando a continuación la última versión de la función Dashboard_by_email.exe, que permite que cualquier captura de pantalla (no solo de Dashboards) se adjunte automáticamente a los correos electrónicos. El programa debe ejecutarse al inicio de Windows y el usuario puede obtener la captura de pantalla directamente adjunta a su correo electrónico presionando CTRL + ALT + D. Haga clic en el enlace de abajo para descargar.

Panel de control por correo electrónico


We are also aware that the market is now offering add-ons for Dashboard Design which can also meet this and other requirements. You can check out what our friends at Data Savvy Tools (http://datasavvytools.com/) created for dashboard printing. We have tested their component that allows the selection of dashboard components to be printed out (and it´s great).

Háganos saber sus comentarios y estaremos más que felices de discutir estas soluciones con usted.


SAP Universe Designer Tricks and Tips: Table Mapping

You know everything there possibly is to know about SAP Universe Designer right? Well, I bet that there´s still a trick or two you can discover. For example, there is one function not frequently used in Universe Designer called Table Mapping. This option was originally included in Universe Designer to protect some data to be seen by Developers (the developers´ user group sees the data from a different table than the Business users).

In this article we are going to show how to implement this table mapping feature for the use that it was meant for and we will then apply it in a couple of real life scenarios to provide developers with a simple and effective solution that minimizes the maintenance on their systems.

In order to create a replacement rule, follow the steps below

1. Go to Tools – Manage Security – Manage Access Restriction.

Foto 1
Foto 1

2. Click New to create the new restriction

Picture2
Picture2

3. Go to Table Mapping and click Add to create the new rule

Picture3
Picture3

4. Fill in the tables you want to replace. In this case, we want the developers to see the data from the table SALES_FACT of the schema DEV_DB instead of PROD_DB (where we are storing the production data).

Imagen4
Imagen4

5. Click ok, fill in the name for the rule (In this case Developers Sales) and click ok

Picture5
Picture5

6. To apply this rule only to the user group “Developers”, click on “Add user and group”

Picture6
Picture6

7. Select the group IT, and click Ok

Picture7
Picture7

8. Apply the rule to the IT group

Picture8
Picture8

Once we have published the universe, all the reports will change the SQL code automatically between the tables DEV_DB.SALES_FACT and PROD_DB.SALES_FACT depending on the user that is logged into the system.

One important point to take into consideration is the priority of the rules: In case of conflict, the restriction with the highest priority – lowest priority index –  lowest priority number will apply.

The example we reviewed above (dynamic change between developers and business user tables) is the most typical use for this functionality. However, there are some other scenarios where the table replacement could be very useful:

Scenario 1: We are reloading data on a production table. Previously, we have created a copy of the old data in a temporary table that we want to use for reporting while the reloading has not finished.

Solution: We can add a new rule to replace the original table for the temporary one, and apply it to the group “Everyone”. As soon as the reload is completed we can delete the rule. This process is much faster than renaming the table on the universe and to change all the objects that the universe is using on this table.

Scenario 2: We have different fact tables for different departments with the same or similar table structure and  all the dimension tables are common. We are looking for the best solution that reduces future maintenance.

Solution: Instead of creating different copies of the same universe by changing the fact table, we can create one universe and use the table replacement functionality to dynamically switch the fact table depending on the user functional group (in this case would be the department) that the user belongs to.

As we have seen in these examples this table mapping feature provides the developers with simplicity, effectiveness and maintenance reduction on their systems.

Si tiene alguna pregunta, no dude en dejar un comentario a continuación.

Xcelsius in BI on Demand (BIOD)

In this blog article I am going to talk about Xcelsius in SAP BI On Demand (BIOD). What I am going to explain are the steps that you should follow to upload an existing Xcelsius Dashboard to the BIOD system. 

What is BIOD?

First of all, for those who don’t know what is BIOD I will give a brief explanation. Basically we can say that BIOD is the most complete and approachable cloud based business intelligence suite available in the market today. BIOD is software as a service; you do not need to install any software on your machines to get instant value from the system. All you need to do is Log in and provide some data. It is a cheap BI solution, due to the fact that you don’t need to make a huge investment in hardware, licenses, etc... everything is in the net.  The target for this technology is small companies, which are less likely to be able to acquire a BI system due to the costs, but with BIOD they have an accesible  way into SAP BusinessObjects analysis system. In BIOD you are able to create:

  • Xcelisus Dashboards
  • Web Intelligente reports
  • Explorador

You can get more information about BI On Demand here.

 Now, let´s see how to upload an existing XCelsius Dashboard to the BIOD system.

How to upload an Xcelsius Dashboard to BIOD?

First of all, if you don’t have a BIOD account you should create it. It s free, and with it you will able to test most of the features of this cloud system. Click here to Sign up.

Once we are logged, we will see this screen.

Now I want to show you how you should upload an existing Xcelsius file with static data to the BIOD system.

First of all we should create the DataSource, so in my Stuff panel we should select Datasets. After that we click Add New Button  -> Add Dataset

Then we should chose from which place we will select the dataset. We have several options: Create From Query (this option is only available in the BIOD Advanced version, where the connection to a universe is possible), bring data from salesforce or create an empty dataset from scratch and finally, we can upload a file (xls,xlsx or csv) which we will use in this example.

As I said before, we select an excel file as source of our dataset, in the first row of our excel file it is important to have the labels of each column. We can also edit this dataset, change the value type of each column, the label name, etc...

At the bottom of this page we can find the properties section, here we should enable the Web service. Once we have done this, the system will generate a url that will be the reference to the dataset in our dashboard.

The next step will be to upload the Xcelsius file as a template, so we select Add New -> Add Template.

We create a name for this template, uncheck the Create a new Xcelsius file check box and finally, select the xlf file that we have locally.

The screen below will then appear. In order to connect the dataset to our xlf file we should select the blue sentence (you may click here to edit the Xcelsius file). You can also attach an image of the dashboard as a thumbail for repository. The object selection will be fancier.

Once the Xcelsius editor is opened we add a connection using OnDemand -> Add Connection menu option. This will create one Flash Variables connection ([Flashvar]) and two Web Service Connections ([OD_Data1 and OD_Data2). In our case we should delete one data connection because we only have one source, but in case we need more data sources we can create as many as we want. It will also create a new tab in the XC spreadsheet that contains these cell bindings.

After that we configure the data connections. Open the Data Manager (Data -> Connections) and you will see a Connection of type FlashVars.  You should see the following:

  • get_data_url: (mandatory). This should be bound to the cell which the Web Service Url of the Web Service Connections are also bound to. If you have multiple connections this should be bound to the range which holds those connections.

Then each Web Service Connection (OD_DataN), in our case only OD_Data1 points to the set of cells to which that connection outputs its data.

These are the next steps that you should follow in order to setup the dashboard:

  • Click on My Datasets and click copy beside the dataset OD_Data1.
  • Paste the url from dataset to the WSDL URL input box of a Web Service connection

  • Click Import to import the schema.
  • Bind the web service url to the same cell as get data url (Note: if you used the Add Connection process this should already be done).
  • Bind the headers and the row values.
  • Set Refresh on Load to be true.

After these steps you can save your changes and then click the Back button to go back to Edit Connection step of creating a template. You should see your connection listed on the screen.

Click Next to go to the Edit Sample Data step, you can choose to add in your sample data from the XLF if you like, and then click Finish.

Finally we will create a visualization using this template. We select our Data Input, in this case Data Source.


If we go to the visualization menu we can find the object.


In conclusion we can say that the BIOD system is a nice tool to start testing the power of the SAP solutions without a potential heavy investment at the beginning. It can be also a good tool to make demos on and show our dashboards to customers. It is very interesting to test the explorer tool, you can see the amount of options that the BIOD brings you in terms of data analysis.  If you are interested in the advanced solution you should get in touch with SAP.

If you have any comment or doubts do not hesitate to contact us or leave a comment below.

Abordar el dilema de la conciencia agregada

In my last project I faced a situation where the customer asked me about the best option for a particular topic and this time my answer had to be "it depends". As a consultant, my duty was to provide two different options (with their corresponding pros and cons) but I could not make a decision on this, since the answer was highly dependent on the composition of IT service providers in different areas and also their road map. In general BI terms, we could define aggregation as the process of summarizing information at a certain level of detail in order to improve the performance. The Kimball Group defines Aggregate Navigation as the ability to use the right aggregated information and recommends to design an architecture with services that hide this complexity from the end user. In the BusinessObjects world the same concept is called Aggregate Awareness and the database administrators community usually refers to it as query re-write.

En SAP BusinessObjects, esto se puede lograr mediante el uso de la función @aggregate_aware, contextos y objetos incompatibles en el diseñador de universo. En un nivel de base de datos (RDBMS), ciertos proveedores proporcionan esta característica a través de vistas materializadas con opción de reescritura de consulta (Oracle, Sybase, DB2, Informix, PostgreSQL y algunos otros).

Así que aquí tenemos el dilema: ¿dónde colocar esta lógica en un entorno de cliente: en la capa física o en la capa lógica?

Ambas opciones son válidas, pero hay algunas consideraciones que deben tenerse en cuenta desde diferentes puntos de vista:

Comparación de tablas

La información que se ve en la tabla anterior ya puede ser interpretada, pero como resumen, mi recomendación sería:

Implementación de la conciencia agregada en SAP Business Objects:

  • Ideal para una arquitectura con muchas fuentes de base de datos (no todas las fuentes de base de datos admiten la característica de reescritura de la consulta y debe mantenerse en cada una de ellas)
  • Es bueno tener si el proveedor de la base de datos puede ser cambiado en el futuro (no hay cambios necesarios en el universo)
  • No hay acceso a administradores de base de datos que puedan ajustar correctamente la base de datos
  • Arquitectura de informes cerrada basada en una capa semántica fuerte en Business Objects
  • Existe la necesidad de un repositorio centralizado de metadatos

Implementación de mecanismos de reescritura de consultas en el RDBMS:

  • Ideal para una arquitectura con muchas herramientas de informes que acceden a la misma base de datos
  • Acceso a administradores de bases de datos sólidos
  • Simplifica el diseño del universo
  • No es necesario un repositorio centralizado de datos

If after reading this post you still have doubts on what direction to go for at your company or customer, do not hesitate to contact clariba at info@clariba.com or leave a comment below.

SAP BusinessObjects Explorer 3.2: Creating Row-Level Security

In the past few months I had the chance to implement a solution based on the combination of SAP BusinessObjects Explorer and mobile devices. The challenge was: “I want to explore the same information that I see on my dashboards with SAP BusinessObjects Explorer on my iPad. In this particular case, some of the customer`s dashboards were really complex and we had to deal with many issues. Today I would like to share with you how we solved one of these issues:

How to implement row-level security into a space of Explorer?

The solution to this challenge cannot be based in any case of security implemented at universe level, in SAP BO Explorer the information of the spaces is retrieved when we index the space, this means that any kind of security applied at universe level will have a direct impact when we index the space. What we needed was a space with all the information but able to be filtered on demand based in some personalization rules.

With SAP BO Explorer 3.2 we are able to generate and apply this kind of security by creating two spaces: one reference space with all the possible information to explore and one personalized, where we will be able to filter the information displayed on demand based on the rules of personalization and making use of the reference space.

Definition of the scenario

To be able to follow the implementation of the solution, assume that we start from:

  • SAP BusinessObjects XI 3.1 installed and fully operational
  • SAP BusinessObjects Explorer 3.2 installed and fully operational

To make it easy to follow I will make use of the eFashion universe and we will need to create users in BO according with the list of values of Name of Manager dimension (Store -> Store Details->Name of manager).Note that the name of the users should be exactly the same as the values of the dimension.

We will create a new space based on the eFashion universe information. The personalization rule is that the Store managers will have access to the space but they will only be able to see the information related to their Store(s).

Creating the e-Fashion Reference space

First open SAP BO Explorer and login with administrator credentials. Click in Manage Spaces, select e-Fashion Universe and press New

In the tab Properties introduce a Name, in our case eFashion Ref, and select a folder under Public Folders, for the example Public Folders -> Explorer Spaces

The users should not be able to access this space, so remember to uncheck the option Show on Home Page

In the tab Objects select the objects that we will use in the space, in the example this tab will look like this

Then click Validate the space and then OK to save the space

Now you will have to Index the space, to do this just press the Index buttonOnce the status check shows the following symbol the space is successfully indexed.

Creating e-Fashion Personalized Space

Now we will implement the space to be accessed by the users, in this space we will make use of the eFashion Reference space created before to build a space with the personalization rules defined.

Log in with Administration rights into SAP BO Explorer, go to Manage Spaces, select the eFashion universe and press New. In the tab Properties introduce a Name, in our case eFashion Pers, and select a folder under Public Folder, for the example Public Folder -> Explorer Spaces

Select the same objects that we have used to create the eFashion Ref espacio

Go to tab Personalization, check Personalize information space Exploration and Select the eFashion Ref space from the list Select an information space

Now select Usuario, from the table To Filter, and select Name of the Manager in the drop-down list in the column Filtered By.

We will link the rest of the dimensions of the personalized space with their corresponding ones on the reference space. The Personalization tab should finally look like this:

Validate the space and press Ok to save it and Index the new space eFashion Pers

Security Topics

Before testing the solution, and to avoid strange behaviors of the SAP BO Explorer spaces, we will have to review the security applied to the different components involved in SAP BusinessObjects. To “make our lives easier” I suggest creating a User Group (i.e. Explorer Users) in SAP BO and I strongly recommend reviewing this list of topics to ensure that the group has:

  • Granted access to Explorer application
  • Granted access to the Universe
  • Granted access to the Connection used on the universe
  • Granted access to the folder where the spaces will be stored.

In this example, what I did was to grant View On Demand access to all of the items of the list.

Finally the solution is ready to test!

Testing the solution

Log on in SAP BO Explorer with one of the users we have created, i.e. Quinn, from the Home tab we will access the eFashion Pers space and see only the data belonging to manager Quinn

If you log on with another user created, i.e. Steve, from the Home tab we will access the eFashion Pers space and see only the data that belongs to Steve

I hope you found this article interesting. For any queries regarding the contents of this article please leave a comment and I will readily reply.

SAP BusinessObjects Mobility Solutions (Parte 2 - SAP BI Mobile)

This is the second article of the SAP Mobility Solution series.  It is time to review the second Mobile application that has been release by SAP Business Objects: SAP BI Mobile

If you have not  read the first article on SAP Explorer yet, check it out.

Just as a brief reminder that both this and the previous tool can be downloaded (if you are an SAP partner) through SAP Marketplace

If you are not an SAP partner but still feel like trying these tools you can still download the mobile applications from the app store and try out the demo servers SAP has made available.

Now let’s start reviewing the second Mobile tool from SAP Business Objects

SAP BI Mobile

The SAP BI Mobile application allows WebI and Crystal reports to be displayed and distributed through Mobile devices. The application we will review here is the Ipad version but other mobile devices are also supported. The Ipad version of this application can only be installed if you have Business Objects XI 3.1 SP3 or higher, so be prepared to patch your system if it is not at this level.

Click Here to find a complete overview of this application.

The first step to get this application running is to install the server side of the software. To do so you need to download two files from the SAP Marketplace: the BI Mobile 3.1 SP3 file and also the BI Mobile SP4 (required for Ipad support)

Instalación

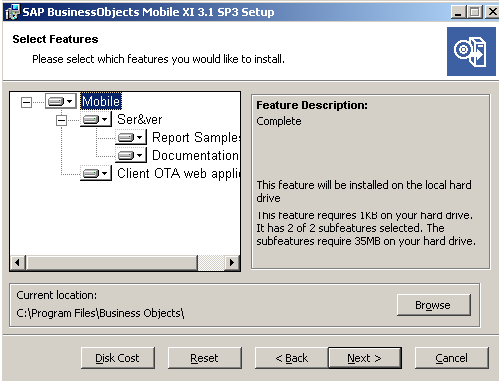
The installation is also straightforward and you should only modify the default settings of the install if your Business Objects system configuration requires it.

For example, if you have a web server separated from the application server then you will have to install those two sides separately (Custom Install). In our example, since all the components are on the same machine we will install all the software on the same place (Complete Install).

You can see in the screen below how components are separated in the install process.

Once you run through the install for the BI Mobile SP3, you will also need to install SP4. This patch installation does not require any configuration and will only write the patched files on the home business objects directory.

After these two installations are complete you will notice new applications are installed on the server components of you Business Objects system.

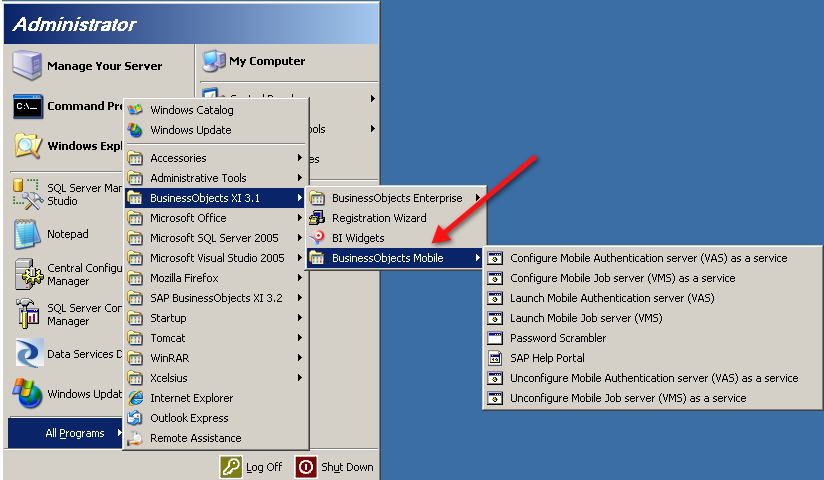
Run both of the Configure as a service options (only on windows install) so you can also have the BI Mobile components available as services under windows.

Make sure your new Mobile services are started and remember to set them to start automatically in case they need to remain ON along with the Business Objects system.

Deploying Web Components

The web part of the BI Mobile application has also been generated during installation but for some reason they are not automatically deployed (at least in our test cases). Therefore you will need to move them yourself to the Tomcat webapps directory so they are deployed.

Browse to the following directory: $BOBJ_Home/Business Objects 12.0/java/

Locate the following files:

  • MobileBIService.war
  • MobileOTA.war
  • MOBIServer.war

Copy these files to the webapps directory located at: $BOBJ_Home/Tomcat55/webapps

When the .war files are copied to this directory they will be automatically picked up by Tomcat and new directory apps will be created. If the deployment is successful you should be able to access the Mobile default web page at:

http://yourserver:8080/MobileOTA

If a webpage comes on with options for different mobile devices, we are now ready to install/configure the mobile application on the ipad.

La aplicación móvil

First off, we need to download the application from the App Store. You would find it under the name SAP BI Mobile (do not confuse with Mobile One app)

Once downloaded, it is time to configure the settings for a new Mobile connection.  Start the app on the Ipad and click on the Settings option at the bottom.

Select the "add a connection" option where you will have to provide the following:

  • Nombre de la conexión
  • Server URL. This is the name:port of the machine where the BI Mobile web component has been installed (without http in front)
  • The CMS name that controls the BI Mobile server components
  • The Authentication method
  • Nombre de usuario y contraseña

Save the configuration and select the newly created connection.

If the connection is successful we will face the following screen on the Ipad application.

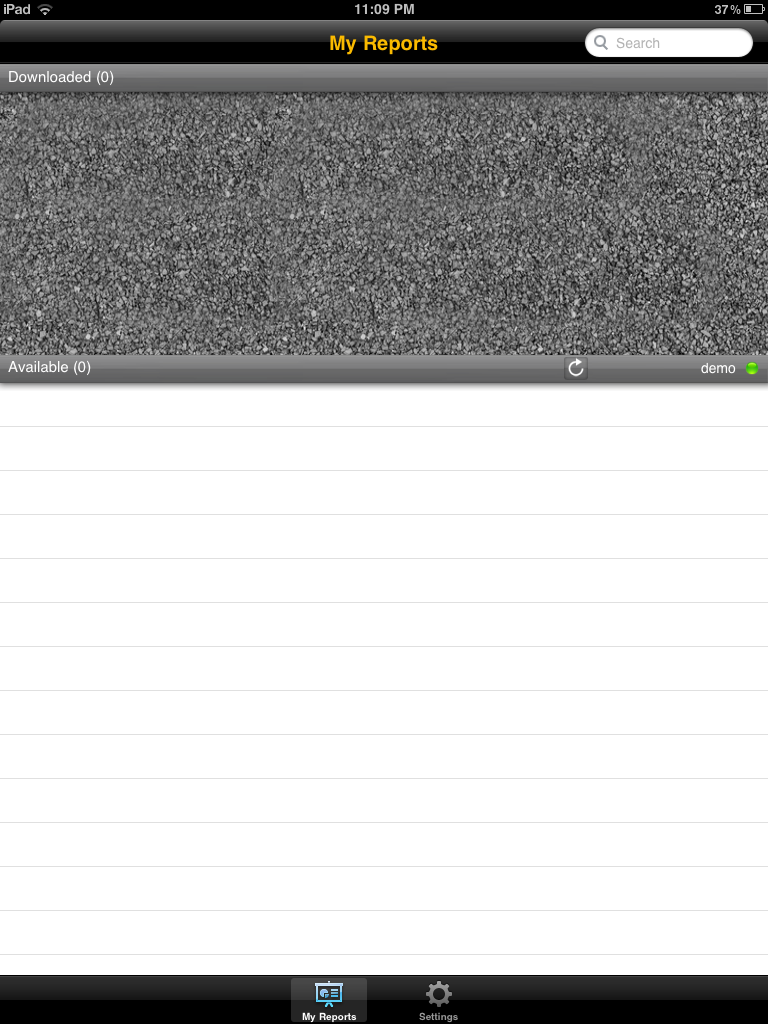
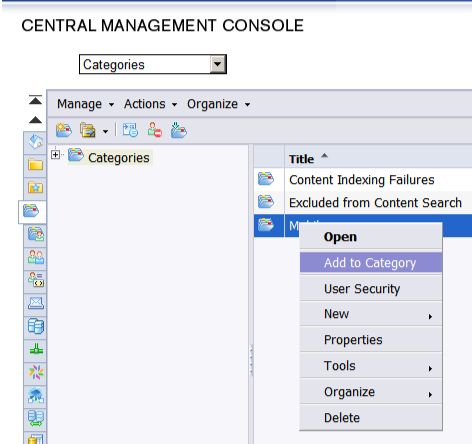
The connection to the mobile server has been successful but we have no reports to show yet. To make new reports available to the mobile application we will have to tag them as mobile compatible. This is done by adding the reports to a category called Mobile. This category can be customized as desired but for this example we will use the default value.

Select the reports we want to make available on the BI Mobile application and categorize them as Mobile.

NOTE: In most cases the category does not previously exist and you might need to create it prior to this step.

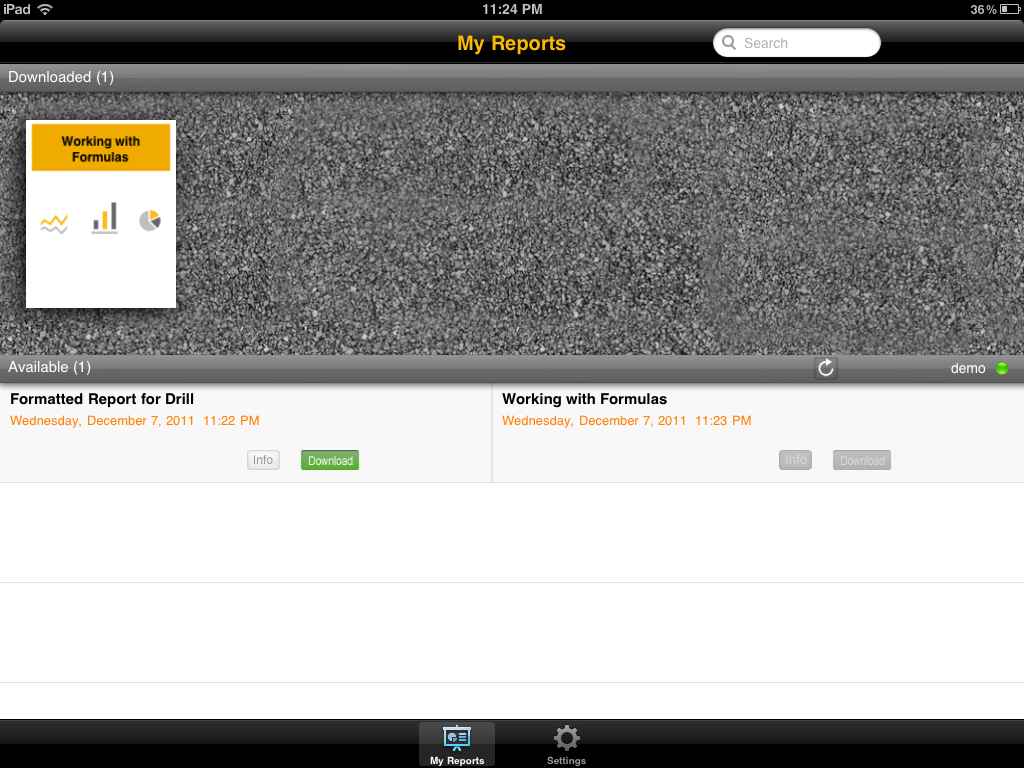
Almost immediately after this is done, you will see the categorized reports appear on the lower part of the BI Mobile application.  The reports are now ready to be downloaded to the Ipad.

Click on the green download button that appears next to each report.

When the download is completed the downloaded report will appear on the upper part of the BI Mobile application. We can now click on the report on the upper part and you will find the Mobile version of your WebI/Crystal report.

Be aware that not all WebI capabilities are supported by the BI Mobile version. To understand the limitations you can review the product guide here

On the same document we can also find some useful best practices on how to design a WebI/Crystal report for Mobile viewing and templates that can help you when designing new reports according to mobile devices´ size.

Although the variety of graphs and interaction in the BI Mobile application is still quite basic, we think SAP is in definitely on the right track.

Appendix on Business Objects XI 4.0

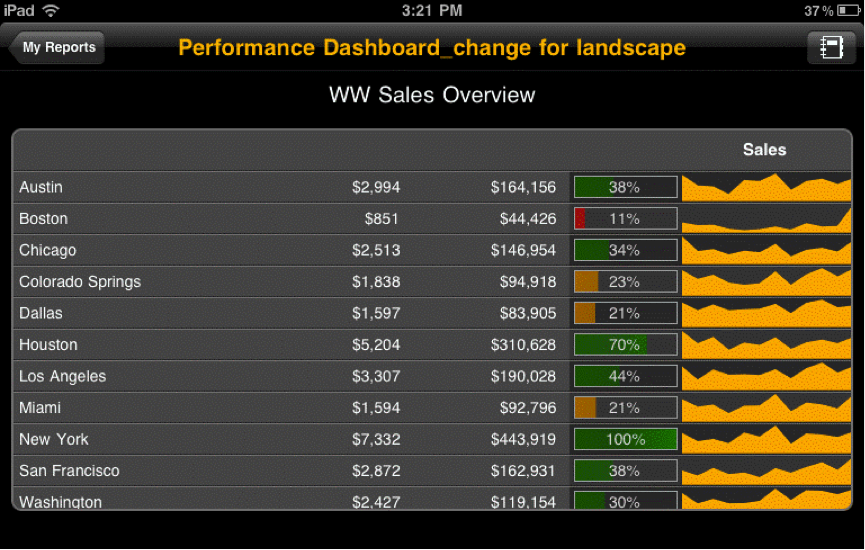
Although our example reviews version 3.1 of the Mobile application we also advise to review the guide for release 4.0 as it contains additional features on the BI Mobile application. The additional features include in-table graphics such as percentage bars or sparkline trends. See screenshot below:


Conclusion on SAP BusinessObjects Mobility Solutions

This is a promising start. Chances are that  soon SAP will extend the devices covered, support more complex graphs and take better advantage of the Ipad interaction capabilities as well.

With mobile solutions you will be able to optimize your existing investment by bringing your content to more mediums, you will be able to provide instant answers to more people, no matter where they are working from, therefore, you will boost the performace of your organization. All bets are on mobility!


Si está interesado o ha trabajado con esta aplicación, o si cree que podría ser útil en su organización, por favor deje un comentario a continuación.

Clariba y SAP MENA Le invitamos a asistir a nuestro Webinar de Finanzas Central (Serie de Webinar de MENA BI)

SAP MENA y Clariba le invitamos a asistir a nuestro seminario web de Finanzas Central el lunes, de 14:00 a 15:00 (hora local de los Emiratos Árabes Unidos) para conocer más sobre los beneficios de nuestro solución. (Presentado en inglés)

To Register for the Webinar CLICK HERE

Abrimos oficialmente nuestra serie de seminarios Web de MENA BI con el primer seminario web sobre Clariba Finance Central, una solución interactiva y fácil de usar que centraliza toda la información financiera en un solo panel de control, permitiendo un análisis extenso en un formato muy visual. El CFO. Con esta única versión de la verdad, su departamento de finanzas puede visualizar todos los KPI financieros relevantes y realizar comparaciones fáciles con presupuestos y objetivos de rendimiento.

La solución se desarrolló utilizando la tecnología SAP BusinessObjects BI líder y se puede integrar con cualquier fuente de datos y adaptarse a cualquier industria. Además, se puede incorporar a los dispositivos de Microsoft Office y móviles de su empresa, lo que permite un fácil acceso a datos históricos y actuales.

El seminario tendrá el siguiente Programa:

  • Bienvenida e Introducción por SAP MENA
  • Clariba Finanzas Central:
    • Retos de los departamentos de finanzas
    • Beneficios de nuestra solución
    • Demostración interactiva
  • Presentación de SAP BusinessObjects suite por SAP MENA
  • Q & A

To Register for the Webinar CLICK HERE

For more information about our SAP BusinessObjects solutions for Finance Departments, visit our web site to view a demo video about Clariba Finance Central: Click Here Atentamente, Xavier Marigó Clariba Sales Manager MENA


EspañolEnglish