Before we get started, if you’re new to this series, it’s worth going back and reviewing the previous entries before continuing, as each builds on the last. To recap briefly, Part 1 is about creating a development environment, Part 2 covers table structures and rows, Part 3 and Part 4 show you how to build federated scenarios, and Part 5 discusses calculation views. Once you’ve checked back and followed all the steps in the series so far, you’ll be ready to work through this final article in the series.
We’re completing our SAP HANA series with an exploration of analytic privileges—covering general security and how to practically apply analytic privileges to restrict the data a user sees from the created models in your workspace.
1. Analytic Privileges
Los Analytic privileges otorgan a diferentes usuarios acceso a diferentes porciones de datos en la misma vista, según su rol comercial. Dentro de la definición de un Analytic privilege, las condiciones que controlan qué datos ven los usuarios se definen mediante SQL.
The first step is to create a new analytic privilege, to do that create a new SAP HANA database artifact and select ‘Analytic Privilege’ in the corresponding section.
When the object has been created, open it and add the model you want to apply. In our case, it will be the calculation view ‘CUSTOMER_YEARS’. Select the column ‘SOURCE’ as an attribute restriction and add the restriction under the Restriction Type column, as shown here:
Next, we need to assign this type of security to the calculation view. Open the view, and in the semantics node go to ‘View Properties’ > ‘General’ and then in the ‘Apply Privileges’ section select ‘SQL Analytic Privileges’ and build it as follows:
Una vez que esta implementación se haya completado correctamente, también podemos implementar el archivo de analytic privileges. Para probar si el procedimiento funciona correctamente, intente realizar una vista previa de datos en la parte superior de la calculation view. Si todo es correcto mostrará un error como el siguiente:
Para corregir este error, debemos asignar este privilegio analítico a un rol y eso a su vez nos permitirá asignarlo a un usuario.
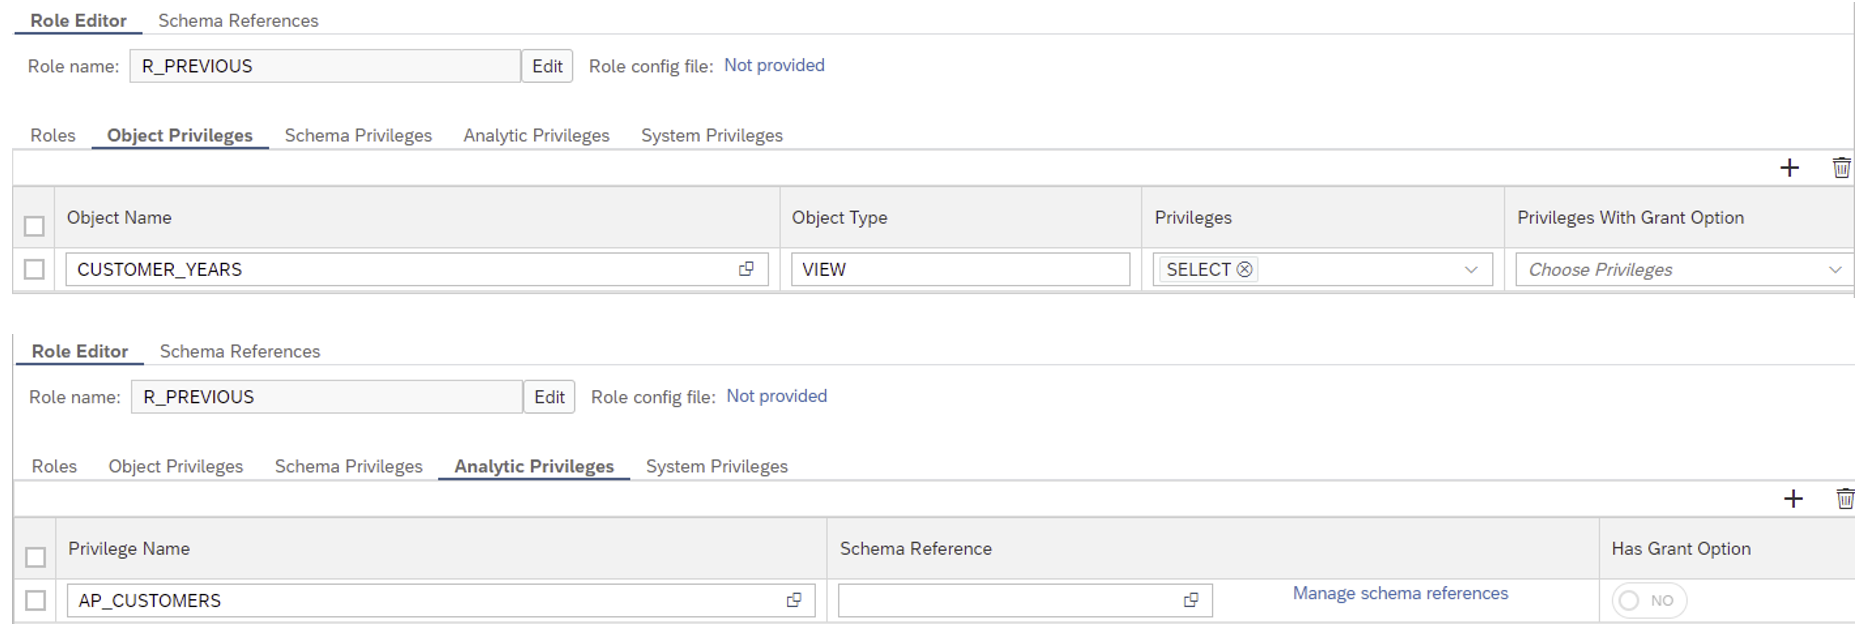
To do so, create a role as a database artifact and copy the following configuration. Note that the role file has 2 definitions, one as an ‘Object Privilege’ and another as ‘Analytic Privileges’, make sure to declare both in the same artifact and then deploy it, as shown here:
Now we can assign the role to a user. This user will have permission to select on the calculation view and to see any data tagged with ‘Anterior’. Go to the database explorer and open a new SQL Console with the admin user. In this example, the user is DBADMIN and was defined during the creation of the project.
Las líneas a continuación crean un usuario y lo asignan al rol:
CREATE USER U_PREVIOUS PASSWORD “
GRANT HANACLOUD_HDI_DB_1."R_PREVIOUS" TO U_PREVIOUS;
Conectémonos con el nuevo usuario y ejecutemos una selección en la vista de cálculo:
CONNECT U_PREVIOUS PASSWORD "
Tenga en cuenta que, aunque también hay datos de 2022 en el conjunto de datos, la salida solo muestra los datos históricos. Esto nos demuestra que la configuración de seguridad que implementamos funciona como se esperaba. Siguiendo los pasos explicados en esta sección, ahora puede crear y configurar la seguridad para restringir los datos que pueden ver los usuarios individuales.
2. Aplicar privilegios al usuario de la aplicación
Entonces, en este punto, hemos visto cómo permitir que los usuarios accedan a algunas partes de los datos. Ahora exploraremos cómo otorgar a los usuarios de la aplicación acceso a todos los datos, usando un mecanismo ligeramente diferente.
Para hacer esto, cree un nuevo analytic privilege como se describe anteriormente, agregue la vista de cálculo que desea proteger y no agregue ninguna restricción (si no hay restricciones, puede ver todos los datos disponibles).
Assigning this to a technical user requires a special mechanism. Create a new folder under ‘src’ named ‘defaults’ and create a new role named ‘development_debug_role’. Open it and define as ‘Analytic Privileges’ the analytic privilege we have just created and, finally, build it, as shown here.
Note that there are no ‘Object Privileges’ as the application user already has select privileges in the container by default.
The last step needed is to adjust the file ‘package.json’ making the following change in line 7 and deploying the entire project:
You can just copy the whole section of code to your package.json file. However, the most secure way is to adjust the file as stated in the previous steps. In case copying the whole section of code does not work for you, you may need to adjust "^4.*" and change it to "^3.*" for the file to work.
NB: Recuerde que la carpeta “default” y el rol dentro de “development_debug_role” deben crearse con el mismo nombre y usarse exactamente como en esta guía para que funcionen.
En este punto, puede realizar una vista previa de datos de la vista de cálculo desde el espacio de trabajo y podrá recuperar todos los datos que contiene:
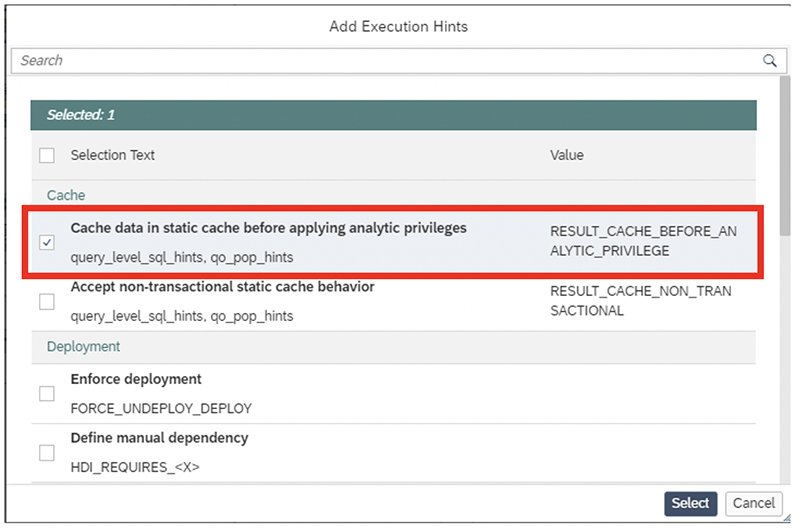
The last step is to adjust the view to create cache entries before analytic privileges are applied. For this, open the semantics node of the calculation view again, go to ‘View Properties’ > ‘Advanced’ > ‘Add Execution Hints’ and select ‘Cache data in static cache before applying analytic privileges’, as shown here:
Con este último paso nos hemos asegurado de que se sigue manteniendo la caché, y por tanto también hemos mantenido el rendimiento del modelo mientras se aplica la seguridad.
3. Conclusiones
En resumen, en el artículo de hoy hemos explicado cómo aplicar la configuración de seguridad necesaria según el usuario que acceda al modelo, desde un usuario normal hasta un usuario de la aplicación. Y hemos logrado todos estos pasos sin afectar negativamente el rendimiento del modelo. Entonces, si ha seguido la guía hasta este punto, ahora debería poder configurar la seguridad de cualquier modelo en cualquier situación.
And if you’ve followed the series so far, you should be able to manage an end-to-end project, from the creation of the environment through to the security and performance review. We hope you’ve found our SAP HANA series useful. If you need to go back and revisit one of the previous articles in the series, you’ll find some useful links below. And in the meantime, don’t forget to keep an eye on our blog for more useful news and guidance.
Publicaciones anteriores de esta serie:
SAP HANA Cloud Series Parte 1: cómo configurar el entorno
SAP HANA Cloud Series Parte 2: cómo definir tablas y roles
SAP HANA Cloud Series Parte 3 – Cómo construir un escenario federado (I)
SAP HANA Cloud Series Parte 4: Cómo construir un escenario federado (II)
SAP HANA Cloud Series Parte 5: Cómo mejorar las vistas de cálculo


