If you’ve been following the series so far, in Part 1 you will have learned how to create a development environment, synchronise it with GitHub via SSH and create a new database project.
And in Part 2 you’ll have learned how to define table structures and rows, how to import data to the development space using HDI containers, and finally how to set up HDB roles with the appropriate privileges.
Si aún no ha leído esas publicaciones, le sugerimos que regrese y se familiarice con ellas antes de trabajar en la Parte 3.
En esta sesión, aprenderá a crear y administrar usuarios, incluida la creación de roles, certificados, fuentes remotas, etc. Los pasos que seguiremos en este artículo son fundamentales antes de continuar con la serie, ya que es vital que su configuración sea correcta para poder trabajar con artefactos de base de datos contenidos en una instancia externa.
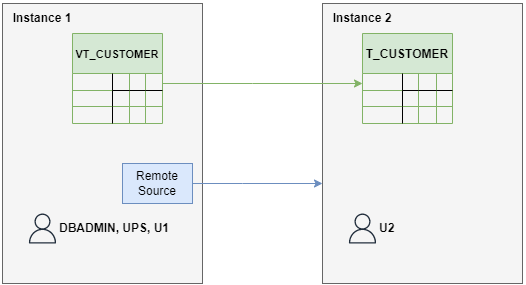
Aquí hay una descripción general de la arquitectura que usaremos en esta sesión: ejecutaremos cada uno de los pasos encima:
Para los fines de este artículo, la Instancia 1 es idéntica a la instancia que creamos y configuramos anteriormente, en las Partes 1 y 2, y que ahora conectaremos a una instancia externa.
Instance 2 is the external instance where the artifacts we need will be contained. For this article, and for demonstration purposes, the instance only contains one demo table named ‘T_CUSTOMER’.
1. Crear los usuarios y privilegios necesarios
Go to the SAP HANA Database Explorer for Instance 1 and open an SQL window in it. To do that you can right-click on the database name and select ‘Open SQL Console’:
Las siguientes líneas de código crearán 2 nuevos usuarios, elijasu propia contraseña y ejecutelas en la consola SQL que acaba de abrir. Antes de hacer esto, asegúrese de haber iniciado sesión en una cuenta de usuario que tenga suficientes privilegios; de lo contrario, use la función CONNECT SQL:
create user UPS password "<password>" no force_first_password_change set usergroup default;
create user U1 password "<password>" no force_first_password_change set usergroup default;
We’ve called the first user “UPS”, which comes from ‘user provide service’, which we’ll explain later when we use it. The other user, “U1”, will be in charge of the setup. Note that both users have fewer privileges than the admin user “DBADMIN”.
El siguiente paso es otorgar los privilegios necesarios al usuario U1:
grant create schema to U1;
grant create remote source to U1;
grant role admin to U1;
We also need to create a certificate for remote sources, which we do like this:
CREATE PSE FOR_REMOTE_SOURCES;
CREATE CERTIFICATE FROM '-----BEGIN CERTIFICATE-----MIIDrzCCApegAwIBAgIQCDvgVpBCRrGhdWrJWZHHSjANBgkqhkiG9w0BAQUFADBhMQswCQYDVQQGEwJVUzEVMBMGA1UEChMMRGlnaUNlcnQgSW5jMRkwFwYDVQQLExB3d3cuZGlnaWNlcnQuY29tMSAwHgYDVQQDExdEaWdpQ2VydCBHbG9iYWwgUm9vdCBDQTAeFw0wNjExMTAwMDAwMDBaFw0zMTExMTAwMDAwMDBaMGExCzAJBgNVBAYTAlVTMRUwEwYDVQQKEwxEaWdpQ2VydCBJbmMxGTAXBgNVBAsTEHd3dy5kaWdpY2VydC5jb20xIDAeBgNVBAMTF0RpZ2lDZXJ0IEdsb2JhbCBSb290IENBMIIBIjANBgkqhkiG9w0BAQEFAAOCAQ8AMIIBCgKCAQEA4jvhEXLeqKTTo1eqUKKPC3eQyaKl7hLOllsBCSDMAZOnTjC3U/dDxGkAV53ijSLdhwZAAIEJzs4bg7/fzTtxRuLWZscFs3YnFo97nh6Vfe63SKMI2tavegw5BmV/Sl0fvBf4q77uKNd0f3p4mVmFaG5cIzJLv07A6Fpt43C/dxC//AH2hdmoRBBYMql1GNXRor5H4idq9Joz+EkIYIvUX7Q6hL+hqkpMfT7PT19sdl6gSzeRntwi5m3OFBqOasv+zbMUZBfHWymeMr/y7vrTC0LUq7dBMtoM1O/4gdW7jVg/tRvoSSiicNoxBN33shbyTApOB6jtSj1etX+jkMOvJwIDAQABo2MwYTAOBgNVHQ8BAf8EBAMCAYYwDwYDVR0TAQH/BAUwAwEB/zAdBgNVHQ4EFgQUA95QNVbRTLtm8KPiGxvDl7I90VUwHwYDVR0jBBgwFoAUA95QNVbRTLtm8KPiGxvDl7I90VUwDQYJKoZIhvcNAQEFBQADggEBAMucN6pIExIK+t1EnE9SsPTfrgT1eXkIoyQY/EsrhMAtudXH/vTBH1jLuG2cenTnmCmrEbXjcKChzUyImZOMkXDiqw8cvpOp/2PV5Adg06O/nVsJ8dWO41P0jmP6P6fbtGbfYmbW0W5BjfIttep3Sp+dWOIrWcBAI+0tKIJFPnlUkiaY4IBIqDfv8NZ5YBberOgOzW6sRBc4L0na4UU+Krk2U886UAb3LujEV0lsYSEY1QSteDwsOoBrp+uvFRTp2InBuThs4pFsiv9kuXclVzDAGySj4dzp30d8tbQkCAUw7C29C79Fv1C5qfPrmAESrciIxpg0X40KPMbp1ZWVbd4=-----END CERTIFICATE-----'
A continuación, para poder obtener el ID del certificado, podemos ejecutar lo siguiente:
SELECT * FROM CERTIFICATES;
Luego lo agregamos a la lista de certificados PSE. En este paso vincularemos el certificado que acabamos de crear con los disponibles para fuentes remotas:
ALTER PSE FOR_REMOTE_SOURCES ADD CERTIFICATE <certificate ID>;
SET PSE FOR_REMOTE_SOURCES PURPOSE REMOTE SOURCES;
Como explicación rápida, PSE contiene los certificados de clave pública que pertenecen a las CA en las que confía el servidor, por lo que solo los usuarios que presentan estos certificados pueden autenticarse.
2. Conectarse con la base de datos
Lo que se necesita a continuación es conectarse a la base de datos con el usuario U1, que es el que acabamos de crear.
Let’s add U1 as a database connection. To do this, right click in the instance name and click ‘Add Database with Different User’. Once the pop-up is shown, enter the credentials used while creating U1 user:
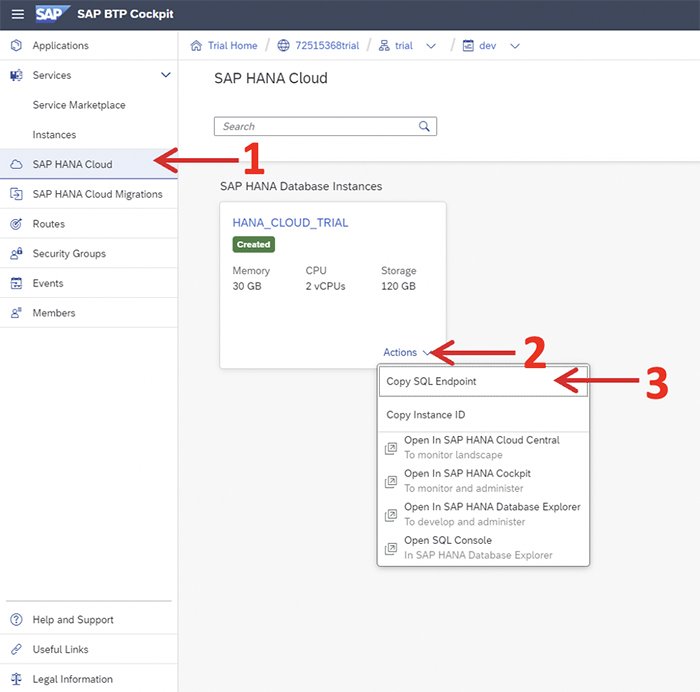
If this option doesn’t appear, we will need to create a new connection manually. The first step is going to the SAP BTP Cockpit and clicking the ‘SAP HANA Cloud’ section on the left panel. Then click on ‘Actions’ and select ‘Copy SQL Endpoint’:
Once the Endpoint is copied to your clipboard, go back to the Database Explorer and click on the “+”button. Select ‘SAP HANA Database’ in the dropdown menu and copy the endpoint in the ‘Host’ section. Note that the endpoint copied finishes with ‘:port_number’, copy the port number on the correct field and erase it from the host section. Finally, enter the username and password for the U1 user you created before and check the ‘Save password’ box:
Then, open an SQL Console with the new user and create the schema VT_DATABASE_I2:
CREATE SCHEMA VT_DATABASE_I2;
3. Creando una Fuente Remota
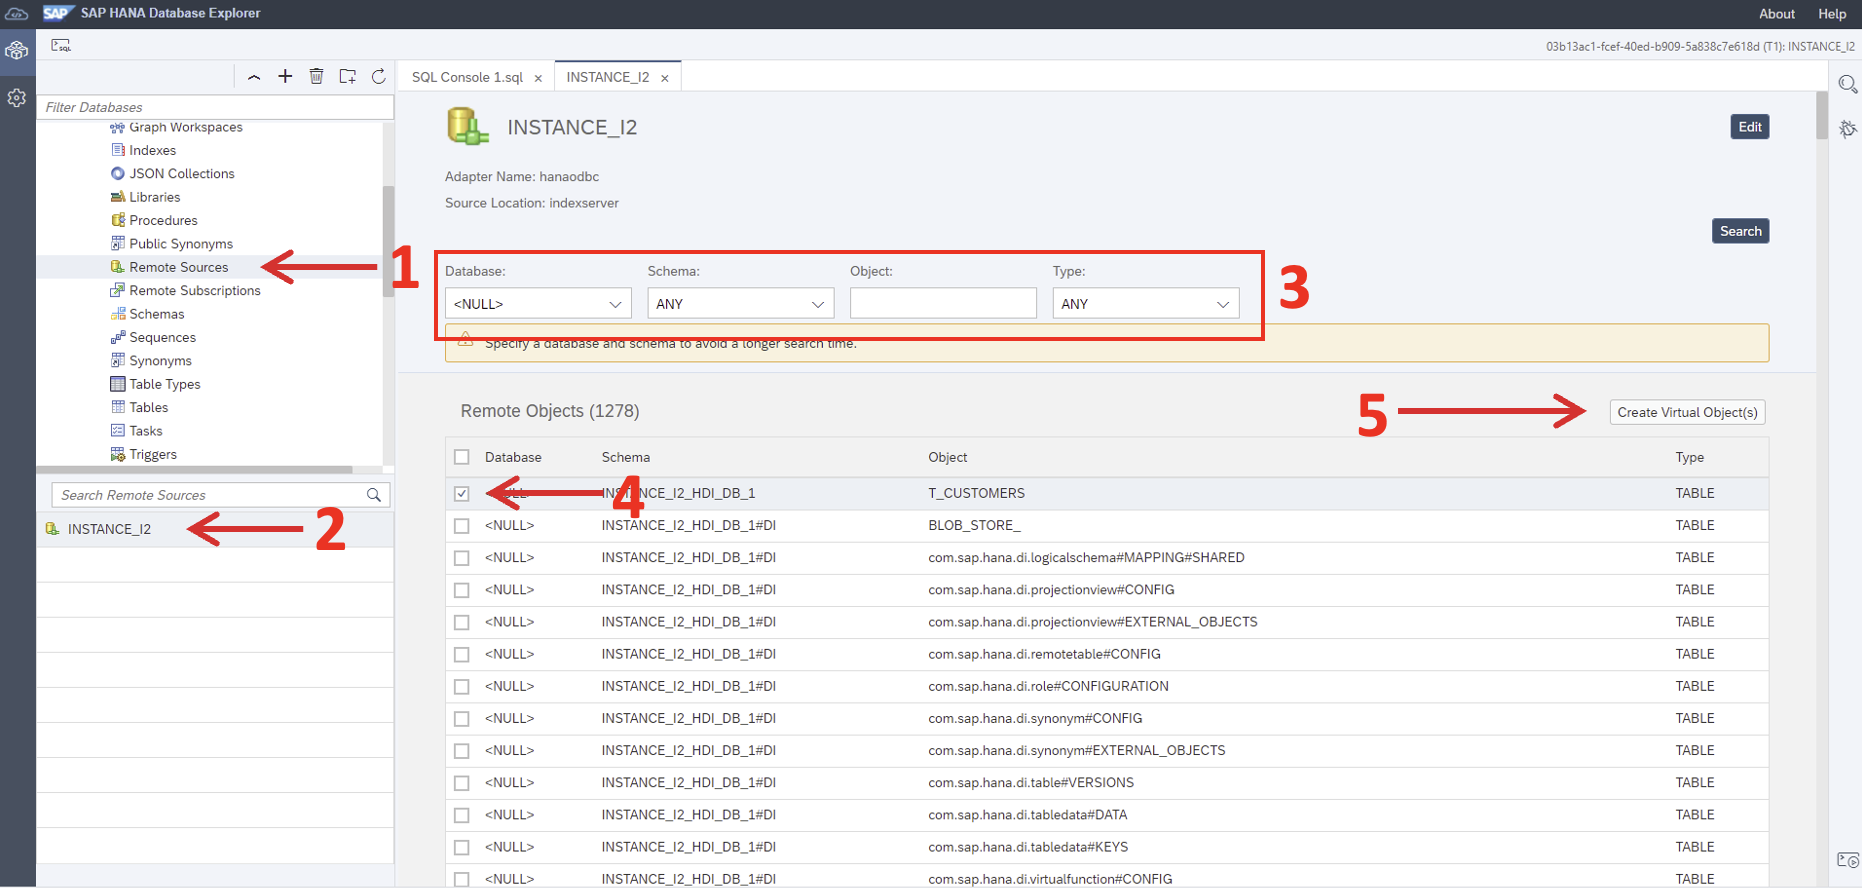
Our objective here is to create a virtual table pointing to the database of Instance 2, but first of all, we need to create a remote source. Expand the options under the database we have just created, right click on ‘Remote Source’ and select the ‘Add Remote Source’ option. Enter the necessary information and open the remote source.
With the remote source open, enter the necessary filters and click on ‘Buscar’. Mark the checkbox of the table, and click on ‘Create Virtual Object(s)’:
When you click the button labelled Step 5 in the screenshot, a menu will pop up. Here, enter a name and the desired schema where you want to create the virtual table. In our case we’ll use the schema VT_DATABASE_I2 which we created a few steps ago. And in this case the table will be named VT_CUSTOMERS.
4. Gestión de autorizaciones
Para trabajar con esta mesa virtual, necesitaremos configurar algunas autorizaciones. Regrese a la consola SQL y escriba los siguientes comandos:
Primero, definimos un rol 'LOAD_VT_CUSTOMERS' que podrá cargar datos en la tabla:
create role LOAD_VT_CUSTOMERS;
grant insert, update, delete on VT_DATABASE_I2.VT_CUSTOMERS to LOAD_VT_CUSTOMERS;
grant LOAD_VT_CUSTOMERS to UPS with admin option;
The next role we need to create is ‘SELECT_ON_VT_CUSTOMERS_WITH_GRANT’ which will have Select permissions on the table, allowing us to see the data contained in it:
create role SELECT_ON_VT_CUSTOMERS_WITH_GRANT;
grant select on VT_DATABASE_I2.VT_CUSTOMERS to SELECT_ON_VT_CUSTOMERS_WITH_GRANT with grant option;
grant SELECT_ON_VT_CUSTOMERS_WITH_GRANT to "_SYS_DI#BROKER_CG"._SYS_DI_OO_DEFAULTS;
En las líneas de código a continuación, estamos definiendo los mismos privilegios que los anteriores, pero en este caso, se otorgan a los usuarios de la aplicación, no solo a los propietarios de los objetos:
create role SELECT_ON_VT_CUSTOMERS;
grant select on VT_DATABASE_I2.VT_CUSTOMERS to SELECT_ON_VT_CUSTOMERS;
grant SELECT_ON_VT_CUSTOMERS to BROKER_USER.RT_DEFAULTS;
Finalmente, otorgamos el privilegio de crear tablas virtuales al usuario UPS. Como se mencionó anteriormente, esto se usará en una sesión posterior:
create role "createVTOnI2";
grant create virtual table on remote source INSTANCE_I2 to "createVTOnI2";
grant "createVTOnI2" to UPS with admin option;
That brings us to the end of this session—we hope you’ve found it both interesting and informative. As we said above, the steps in this part are crucial to the success of the next part, so you may wish to go back and double check your configurations, before you join us for part 4 in the SAP HANA series. In that session we’ll be continuing with the work we’ve done today to complete our guide to building up a Federated Scenario—keep an eye on our blog for the next post.


